You can connect the terminal using the below HW connection ports:
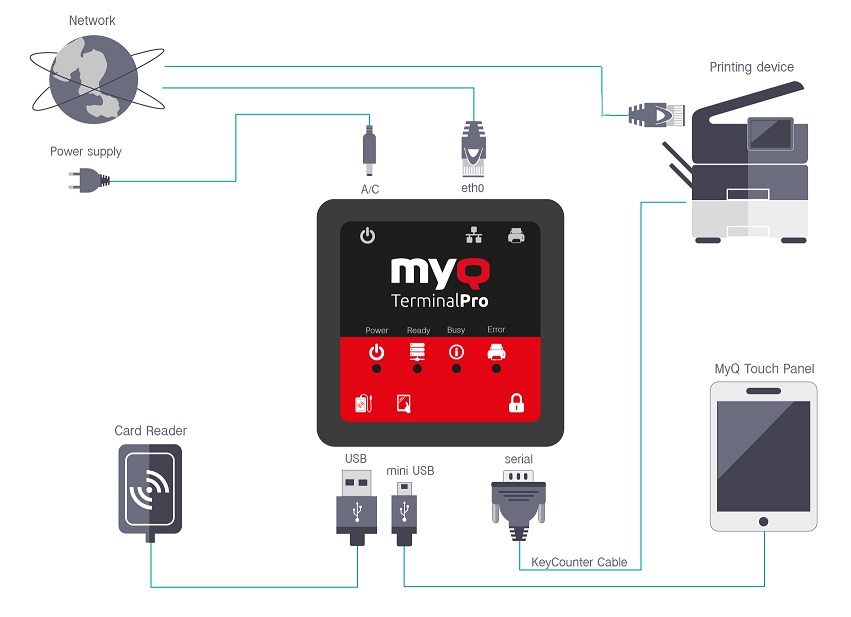
LAN host (eth0) | LAN port for connecting to the customer's network via network cable |
9 pin D-SUB (serial) | Port for connecting a Key Counter cable |
USB port | Standard USB port for the card reader connection |
Mini-USB port | Mini-USB port for the touchscreen display connection |
Power connector (A/C) | Port for the power source connection |
Connect the cables to corresponding ports of the terminal:
Network cable to eth0
(Optional) Touch panel cable to Mini/micro USB
(Optional) USB card reader to USB (keep the terminal off when connecting)
(Optional) Key Counter cable to 9 pin D-SUB
Power cable
Wait till the BUSY SESSION STATE indicator glows green (It should take approximately 2 minutes), and then restart the printing device.
After it is connected, the terminal automatically sets up communication with the device. This setup can take a few minutes and after it is done, you need to restart the printing device.
Use cable holders to keep the cables organized and maintain a neat and tidy appearance on the printing device.

Status indication according to the LED diodes
The MyQ TerminalPro LED diodes provide the following information:
POWER |
|
READY - SERVER STATE |
|
BUSY - SESSION |
|
ERROR - PRINTER STATE |
|
The below LED diodes should be lit after a correct MyQ TerminalPro setup:
Green for the Power diode.
Green for the Ready - Server state diode (after setting up the server via MyQ Terminal Manager).
Green for the Busy - Session state diode.
Red for the Error - Printer state diode (as the printer is not directly connected to MyQ TerminalPro).